Nginx是一款面向性能设计的HTTP服务器,相较于Apache、lighttpd具有占有内存少,稳定性高等优势。Nginx不采用每客户机一线程的设计模型,而是充分使用异步逻辑从而削减了上下文调度开销,所以并发服务能力更强。整体采用模块化设计,有丰富的模块库和第三方模块库,配置灵活。 在Linux操作系统下,Nginx使用epoll事件模型,得益于此,Nginx在Linux操作系统下效率相当高。同时Nginx在OpenBSD或FreeBSD操作系统上采用类似于epoll的高效事件模型kqueue。
本文将教你在腾讯云CVM服务器 Linux服务器上安装Nginx服务软件。并检查其是否正常运行。在安装上,我们分为两种方式,直接使用系统的程序包安装,或采用编译的方式去安装。推荐感兴趣的同学去腾讯云免费 的开发者实验室 自己动手搭建。
连接服务器 首先,我们需要有一台服务器,可以进入腾讯云 官网,然后点击云服务器 ,选择立即购买 按钮。默认弹出的是快速配置,请按照图中设置即可。注意两个地方修改,第一个是地域,这里请选择离您比较近的地区。第二个是操作系统,本文以Ubuntu Server 16.04 LTS版本为例,你也可以选择CentOS 7.2 64位,因为Nginx对Linux支持非常友好,所以本文以Linux为例,选择系统时请勿选择Windows系统。
首先检查你的服务器安全组设置,确保其开放22和80端口。然后我们通过SSH软件登录服务器,如果你本地电脑是Windows情况下可以使用putty等软件,Linux及MacOS请使用终端进行连接。
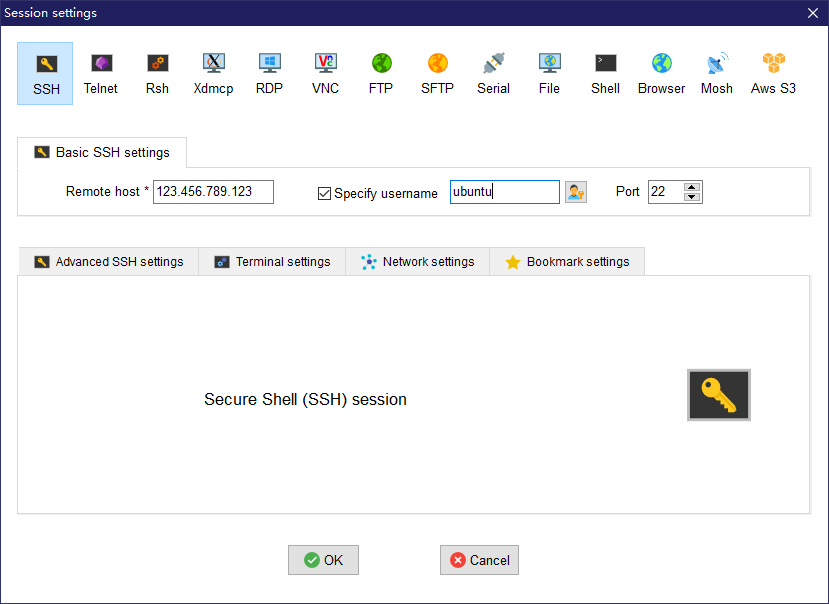
这里以MobaXterm的终端软件为例,点击左上角的Session按钮,选择以SSH方式连接,在Remote host输入你的服务器的公网IP地址,Specify username输入你的用户名,如果你的服务器是Ubuntu系统,请输入ubuntu如果是CentOS系统则输入root。这里我们是Ubuntu系统,所以我们输入ubuntu。
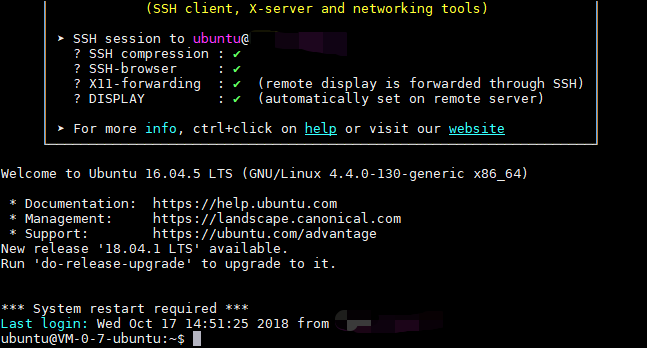
点击OK后,输入你设置的密码(默认不显示),即可连接到你的服务器,你会看到类似下面的页面。
这样,你就进到你所购买的服务器页面了。
使用apt或yum包管理工具进行安装(推荐) 这里安装分操作系统,如果你使用的是Ubuntu系统,那么可以通过apt install nginx命令直接安装,如果你使用的是CentOS操作系统,那么则可以通过yum install nginx命令进行安装。
Ubuntu系统(apt工具安装)
注:在腾讯云购买的服务器默认使用ubuntu账户登录,若想使用root权限执行相关命令,则需要在命令前加sudo命令。
首先,我们需要使用sudo apt-get update更新当前系统下apt包管理器的列表。然后使用sudo apt-get install nginx命令安装Nginx软件。
1
2
sudo apt-get update sudo apt-get install nginx
输入完sudo apt-get update你会看到如下输出
1
2
3
4
5
ubuntu@VM-0-7-ubuntu:~$ sudo apt-get update Hit:1 http://mirrors.tencentyun.com/ubuntu xenial InRelease Hit:2 http://mirrors.tencentyun.com/ubuntu xenial-security InRelease Hit:3 http://mirrors.tencentyun.com/ubuntu xenial-updates InRelease Reading package lists... Done
之后,我们输入sudo apt-get install nginx,得到如下输出
1
2
3
4
5
6
7
8
9
10
11
12
13
14
15
16
17
ubuntu@VM-0-7-ubuntu:~$ sudo apt-get install nginx Reading package lists... Done Building dependency tree Reading state information... Done The following additional packages will be installed: fontconfig-config fonts-dejavu-core libfontconfig1 libgd3 libjbig0 libjpeg-turbo8 libjpeg8 libtiff5 libvpx3 libxpm4 nginx-common nginx-core Suggested packages: libgd-tools fcgiwrap nginx-doc ssl-cert The following NEW packages will be installed: fontconfig-config fonts-dejavu-core libfontconfig1 libgd3 libjbig0 libjpeg-turbo8 libjpeg8 libtiff5 libvpx3 libxpm4 nginx nginx-common nginx-core 0 upgraded, 13 newly installed, 0 to remove and 0 not upgraded. Need to get 2,857 kB of archives. After this operation, 9,307 kB of additional disk space will be used. Do you want to continue? [Y/n]
这里询问我们是否安装,我们按下键盘上的Y,然后按下回车键,之后,你会看到类似如下输出:
1
2
3
4
Get:1 http://mirrors.tencentyun.com/ubuntu xenial-security/main amd64 libjpeg-tu ......... Processing triggers for ufw (0.35-0ubuntu2) ... ubuntu@VM-0-7-ubuntu:~$
注:.........为省略,省略多行命令。
这时,你的Ubuntu系统就已经完整安装好Nginx软件了,现在我么访问你的服务器IPhttp://你的域名/ ,如果你看到如下输出,证明你已经成功安装Nginx。
CentOS系统(yum工具安装) 在CentOS系统下,也可以使用yum包管理工具进行安装,和ubuntu一样,我们先更新系统软件,使用yum update命令进行升级。你会看到下面的输出
1
2
3
4
5
6
7
8
9
10
11
12
13
Loaded plugins: fastestmirror, langpacks Determining fastest mirrors epel 12741/12741 Resolving Dependencies --> Running transaction check ---> Package NetworkManager.x86_64 1:1.10.2-13.el7 will be updated ---> Package NetworkManager.x86_64 1:1.10.2-16.el7_5 will be an update ---> Package NetworkManager-libnm.x86_64 1:1.10.2-13.el7 will be updated ...... util-linux.x86_64 0:2.23.2-52.el7_5.1 vdo.x86_64 0:6.1.0.168-18 yum-plugin-fastestmirror.noarch 0:1.1.31-46.el7_5 yum-utils.noarch 0:1.1.31-46.el7_5 Complete!
接下来,我们安装Nginx软件。可以使用yum install nginx命令来进行安装。同样,会询问我们是否安装,我们按下键盘上的Y,然后按下回车键,之后,你会看到类似如下输出:
1
2
3
4
5
6
7
8
9
10
Downloading packages: (1/21): fontpackages-filesystem-1.44-8.el7.noarch.rpm | 9.9 kB 00:00:00 (2/21): gd-2.0.35-26.el7.x86_64.rpm | 146 kB 00:00:00 (3/21): fontconfig-2.10.95-11.el7.x86_64.rpm | 229 kB 00:00:00 ....... nginx-mod-http-geoip.x86_64 1:1.12.2-2.el7 nginx-mod-http-image-filter.x86_64 1:1.12.2-2.el7 nginx-mod-http-perl.x86_64 1:1.12.2-2.el7 nginx-mod-http-xslt-filter.x86_64 1:1.12.2-2.el7 nginx-mod-mail.x86_64 1:1.12.2-2.el7 nginx-mod-stream.x86_64 1:1.12.2-2.el7 Complete!
Nginx在CentOS上默认没有启动,我们需要输入nginx命令进行启动,如下
1
2
[root@VM_0_7_centos ~]# nginx [root@VM_0_7_centos ~]#
现在,打开浏览器访问你的服务器IPhttp://你的域名/ ,如果你看到如下输出,证明你已经成功安装Nginx。
编译安装 Ubuntu apt包管理器默认的Nginx版本可能过旧,这时我们就需要进行编译安装了,这样能确保我们安装的Nginx是最新版。
首先,我们需要使用sudo apt-get update更新当前系统下apt包管理器的列表。然后我们需要安装相关编译环境。可以使用下面的命令进行安装
1
2
sudo apt-get update libpcre3 libpcre3-dev zlib1g-dev openssl libssl-dev
同样,执行命令过程中会询问我们是否进行安装,我们按下键盘上的Y,然后按下回车键,之后,你会看到类似如下输出:
1
2
3
4
5
Get:1 http://mirrors.tencentyun.com/ubuntu xenial-updates/main amd64 x11-common all 1:7.7+13ubuntu3.1 [22.9 kB] Get:2 http://mirrors.tencentyun.com/ubuntu xenial/main amd64 libice6 amd64 2:1.0.9-1 [39.2 kB] ........ Processing triggers for ureadahead (0.100.0-19) ... Processing triggers for libc-bin (2.23-0ubuntu10) ...
这时,我们的基本编译环境就安装完成了。接下来我们需要下载Nginx源码包,并编译源码。本文撰写日期最新版的Nginx版本是1.15.5,您可以从Nginx官网http://nginx.org/download/获得最新的下载链接。复制你要获取版本的链接,这里我们已`nginx-1.15.5.tar.gz`版本为例。使用下面的命令获取安装包,并解压然后进入Nginx源码包目录。
1
2
3
wget http://nginx.org/download/nginx-1.15.5.tar.gz tar -zxvf nginx-1.15.5.tar.gz cd nginx-1.15.5
输入ls命令,你会看到类似下面的输出。
1
2
3
4
ubuntu@VM-0-7-ubuntu:~$ cd nginx-1.15.5/ ubuntu@VM-0-7-ubuntu:~/nginx-1.15.5$ ls auto CHANGES CHANGES.ru conf configure contrib html LICENSE man README src ubuntu@VM-0-7-ubuntu:~/nginx-1.15.5$
接下来,我们就可以开始编译了。我们输入./configure,系统会检查你当前系统的环境,确保其无任何报错。看到下面报错证明无问题,否则请重新安装上面所述的软件。
1
2
3
4
5
6
7
8
9
10
11
12
13
14
15
16
17
18
Configuration summary + using system PCRE library + OpenSSL library is not used + using system zlib library nginx path prefix: "/usr/local/nginx" nginx binary file: "/usr/local/nginx/sbin/nginx" nginx modules path: "/usr/local/nginx/modules" nginx configuration prefix: "/usr/local/nginx/conf" nginx configuration file: "/usr/local/nginx/conf/nginx.conf" nginx pid file: "/usr/local/nginx/logs/nginx.pid" nginx error log file: "/usr/local/nginx/logs/error.log" nginx http access log file: "/usr/local/nginx/logs/access.log" nginx http client request body temporary files: "client_body_temp" nginx http proxy temporary files: "proxy_temp" nginx http fastcgi temporary files: "fastcgi_temp" nginx http uwsgi temporary files: "uwsgi_temp" nginx http scgi temporary files: "scgi_temp"
接下来我们输入sudo make开始进行编译,你会看到类似如下输出
1
2
3
4
5
6
7
8
9
10
ubuntu@VM-0-7-ubuntu:~/nginx-1.15.5$ sudo make make -f objs/Makefile make[1]: Entering directory '/home/ubuntu/nginx-1.15.5' cc -c -pipe -O -W -Wall -Wpointer-arith -Wno-unused-parameter -Werror -g -I src/core -I src/event -I src/event/modules -I src/os/unix -I objs \ -o objs/src/core/nginx.o \ ....... -e "s|%%ERROR_LOG_PATH%%|/usr/local/nginx/logs/error.log|" \ < man/nginx.8 > objs/nginx.8 make[1]: Leaving directory '/home/ubuntu/nginx-1.15.5'
这样就编译完成了,接下来我们进行安装。我们输入下面的命令sudo make install,会看到如下输出。
1
2
3
4
5
6
7
8
9
10
11
12
13
ubuntu@VM-0-7-ubuntu:~/nginx-1.15.5$ sudo make install make -f objs/Makefile install make[1]: Entering directory '/home/ubuntu/nginx-1.15.5' test -d '/usr/local/nginx' || mkdir -p '/usr/local/nginx' test -d '/usr/local/nginx/sbin' \ || mkdir -p '/usr/local/nginx/sbin' test ! -f '/usr/local/nginx/sbin/nginx' \ || mv '/usr/local/nginx/sbin/nginx' \ '/usr/local/nginx/sbin/nginx.old' ......... test -d '/usr/local/nginx/logs' \ || mkdir -p '/usr/local/nginx/logs' make[1]: Leaving directory '/home/ubuntu/nginx-1.15.5'
接下来,我们执行下面的命令就可以开启最新的nginx服务啦~
1 sudo /usr/local/nginx/sbin/nginx
现在我么访问你的服务器IPhttp://你的域名/ ,如果你看到如下输出,证明你已经成功安装Nginx。
CentOS 同样,我们也可以在CentOS编译安装Nginx,首先,我们需要安装编译环境,可以使用下面的命令进行安装。
1
2
3
4
5
yum install gcc gcc-c++ autoconf automake make yum install pcre yum install pcre-devel yum install -y zlib yum install -y zlib-devel
接下来我们需要下载Nginx源码包,并编译源码。本文撰写日期最新版的Nginx版本是1.15.5,您可以从Nginx官网http://nginx.org/download/获得最新的下载链接。复制你要获取版本的链接,这里我们已`nginx-1.15.5.tar.gz`版本为例。使用下面的命令获取安装包,并解压然后进入Nginx源码包目录。
1
2
3
wget http://nginx.org/download/nginx-1.15.5.tar.gz tar -zxvf nginx-1.15.5.tar.gz cd nginx-1.15.5
输入ls命令,你会看到类似下面的输出。
1
2
3
4
ubuntu@VM-0-7-ubuntu:~$ cd nginx-1.15.5/ ubuntu@VM-0-7-ubuntu:~/nginx-1.15.5$ ls auto CHANGES CHANGES.ru conf configure contrib html LICENSE man README src ubuntu@VM-0-7-ubuntu:~/nginx-1.15.5$
接下来,我们就可以开始编译了。我们输入./configure,系统会检查你当前系统的环境,确保其无任何报错。看到下面报错证明无问题,否则请重新安装上面所述的软件。
1
2
3
4
5
6
7
8
9
10
11
12
13
14
15
16
17
18
Configuration summary + using system PCRE library + OpenSSL library is not used + using system zlib library nginx path prefix: "/usr/local/nginx" nginx binary file: "/usr/local/nginx/sbin/nginx" nginx modules path: "/usr/local/nginx/modules" nginx configuration prefix: "/usr/local/nginx/conf" nginx configuration file: "/usr/local/nginx/conf/nginx.conf" nginx pid file: "/usr/local/nginx/logs/nginx.pid" nginx error log file: "/usr/local/nginx/logs/error.log" nginx http access log file: "/usr/local/nginx/logs/access.log" nginx http client request body temporary files: "client_body_temp" nginx http proxy temporary files: "proxy_temp" nginx http fastcgi temporary files: "fastcgi_temp" nginx http uwsgi temporary files: "uwsgi_temp" nginx http scgi temporary files: "scgi_temp"
接下来我们输入sudo make开始进行编译,你会看到类似如下输出
1
2
3
4
5
6
7
8
9
10
ubuntu@VM-0-7-ubuntu:~/nginx-1.15.5$ sudo make make -f objs/Makefile make[1]: Entering directory '/home/ubuntu/nginx-1.15.5' cc -c -pipe -O -W -Wall -Wpointer-arith -Wno-unused-parameter -Werror -g -I src/core -I src/event -I src/event/modules -I src/os/unix -I objs \ -o objs/src/core/nginx.o \ ....... -e "s|%%ERROR_LOG_PATH%%|/usr/local/nginx/logs/error.log|" \ < man/nginx.8 > objs/nginx.8 make[1]: Leaving directory '/home/ubuntu/nginx-1.15.5'
这样就编译完成了,接下来我们进行安装。我们输入下面的命令sudo make install,会看到如下输出。
1
2
3
4
5
6
7
8
9
10
11
12
13
ubuntu@VM-0-7-ubuntu:~/nginx-1.15.5$ sudo make install make -f objs/Makefile install make[1]: Entering directory '/home/ubuntu/nginx-1.15.5' test -d '/usr/local/nginx' || mkdir -p '/usr/local/nginx' test -d '/usr/local/nginx/sbin' \ || mkdir -p '/usr/local/nginx/sbin' test ! -f '/usr/local/nginx/sbin/nginx' \ || mv '/usr/local/nginx/sbin/nginx' \ '/usr/local/nginx/sbin/nginx.old' ......... test -d '/usr/local/nginx/logs' \ || mkdir -p '/usr/local/nginx/logs' make[1]: Leaving directory '/home/ubuntu/nginx-1.15.5'
接下来,我们执行下面的命令就可以开启最新的nginx服务啦~
1 sudo /usr/local/nginx/sbin/nginx
现在我么访问你的服务器IPhttp://你的域名/ ,如果你看到如下输出,证明你已经成功安装Nginx。
总结 现在你已经成功通过四种方式安装Nginx软件,学会了吗?赶快去购买一台服务器去尝试下吧,不过我建议你使用腾讯云免费 的开发者实验室 进行试验,学会之后在尝试购买新的服务器。
如果你打算长时间使用,可以推荐你使用腾讯云的建站主机 进行配置,独享 CPU、内存、带宽、硬盘等资源,拥有独立 IP 和超大空间,预装网站开发所需的应用环境,并且提供域名绑定、部署 SSL 证书等便捷操作,即买即用,一站式完成应用的搭建。


